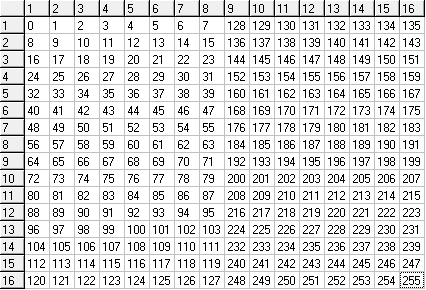
一个GB2312汉字是由两个字节编码的,范围为A1A1~FEFE。A1-A9为符号区,B0到F7为汉字区。每一个区有94个字符。
点阵结构
从图片可以看出:
- 日文编码的第一个字节为点阵的左半部分,第二个字节为点阵的右半部分。

https://www.mediawiki.org/wiki/MediaWiki_and_LaTeX_on_a_host_with_shell_access
安装TexLive,使用 which latex 和 which dvipng 检查是否安装
按照注释中操作
 1<?php
 2# Place this file in extension directory as Mtag.php
 3# Add the following line to LocalSettings.php:
 4# include './extensions/Mtag.php';
 5# Mediawiki will render as LaTeX the code within <m> </m> tags.
 6
 7$wgExtensionFunctions[] = "wfMtag";
 8
 9function wfMtag() {
10    global $wgParser;
11    $wgParser->setHook( "m", "returnMtagged" );
12}
13
14function returnMtagged( $code, $argv) {
15# if you have mathtex.cgi installed:
16    $txt='<img src="/cgi-bin/mathtex.cgi?'.$code.'">';
17# OR if you want to temporarily test a public mathtex.cgi:
18#    $txt='<img src="http://www.forkosh.com/mathtex.cgi?'.$code.'">';
19
20    return $txt;
21}
22?>
下载并解压 Mathtex.zip
The CPU in modern computer hardware performs reads and writes to memory most efficiently when the data is naturally aligned, which generally means that the data’s memory address is a multiple of the data size. For instance, in a 32-bit architecture, the data may be aligned if the data is stored in four consecutive bytes and the first byte lies on a 4-byte boundary.
If the highest and lowest bytes in a datum are not within the same memory word the computer must split the datum access into multiple memory accesses. This requires a lot of complex circuitry to generate the memory accesses and coordinate them. To handle the case where the memory words are in different memory pages the processor must either verify that both pages are present before executing the instruction or be able to handle a TLB miss or a page fault on any memory access during the instruction execution.
IMG file
Make
1dd if=/dev/zero of=fdimage.img count=2880
2# or
3dd if=/dev/zero of=fdimage.img bs=1024 count=1440
Format
1mkfs.msdos fdimage.img
Mount
1mount -o loop *.img /mnt
Bootable
因为制作可启动镜像一定会用到虚拟机,推荐用 Virtualbox,先到网上下个 DOS 启动盘来引导。用 DOS 的 sys 命令传递系统。推荐使用 FreeDOS,属自由软件。也可用 dd 命令 来传递引导引导信息,并复制启动启动时所需文件来做启动盘。以 FreeDOS 为例,传递启动信息用以下命令,其中下载的启动盘为balder10.img 文件
文件所在路径
1vim /usr/lib/systemd/system/SERVICE_NAME.service
服务模板
 1[Unit]
 2Description=Viry Service
 3After=network.target auditd.service
 4
 5[Service]
 6User=root
 7Type=oneshot
 8RemainAfterExit=true
 9ExecStart=/viry/serv/serv.sh
10ExecStop=/bin/true
11
12[Install]
13WantedBy=multi-user.target
14Alias=viry.service
serv.sh
 1#!/bin/bash
 2
 3echo "Sync Time"
 4ntpdate 172.16.1.1
 5hwclock -w
 6
 7TIME=$(TZ=UTC-8 date "+%Y-%m-%d %H:%M:%S")
 8LOG="/viry/serv/serv.log"
 9
10echo "Ready"
11echo "" >> $LOG
12echo $TIME >> $LOG
13
14echo "Start DEMO"
15echo "Start DEMO" >> $LOG
16sh /viry/serv/demo/demo.sh
17
18echo "Finished"
19echo "Finished" >> $LOG
demo.sh
 1#!/bin/bash
 2
 3cd /viry/serv/demo/exec/
 4
 5screen_name="demo"
 6
 7screen -s /usr/bin/bash -dmS $screen_name
 8
 9cmd1=""
10cmd2="./demo"
11
12screen -x -S $screen_name -p 0 -X stuff "$cmd1\n"
13screen -x -S $screen_name -p 0 -X stuff "$cmd2\n"
14
15echo "Demo Started"
16
17exit 0

1<div class="wheelPlayer wheelAnimate">
2    <div>1</div>
3    <div>2</div>
4    <div>3</div>
5</div>
 1.wheelPlayer{
 2   padding: 20px 0;
 3   margin: auto;
 4   width: 350px;
 5}
 6.wheelPlayer div{
 7   position: relative;
 8   height: 25px;
 9   line-height: 26px;
10   width: 70px;
11   text-align: center;
12   border: 1px solid gray;
13}
14.wheelAnimate div{
15   animation: whellPlayer 9s infinite;
16   -moz-animation: whellPlayer 9s infinite;
17   -webkit-animation: whellPlayer 9s infinite;
18}
19.wheelPlayer div:nth-of-type(1){
20   animation-delay: -6s;
21   -moz-animation-delay: -6s;
22   -webkit-animation-delay: -6s;
23}
24.wheelPlayer div:nth-of-type(2){
25   animation-delay: -3s;
26   -moz-animation-delay: -3s;
27   -webkit-animation-delay: -3s;
28   margin-top:  -27px;
29}
30.wheelPlayer div:nth-of-type(3){
31   animation-delay: -0s;
32   -moz-animation-delay: 0s;
33   -webkit-animation-delay: 0s;
34   margin-top:  -27px;
35}
向剪切板写入 图片等任意的数据到剪贴板。 这个方法可以用于实现剪切和复制的功能,是异步的
1document.body.addEventListener(
2  'click',
3  async (e) => {
4    await navigator.clipboard.writeText('Yo')
5  }
6)
Clipboard.read()用于读取剪切板的数据,也是异步的成功返回数据
1vim ~/.Xresource
填写配置
 1xterm.termName: xterm-256color
 2xterm*locale:true
 3xterm.utf8: true
 4xterm*utf8Title: true
 5
 6!fix alt key input
 7!xterm*eightBitInput: false
 8!xterm*altSendsEscape: true
 9
10!xterm*scrollBar: true
11!xterm*rightScrollBar: true
12xterm*SaveLines: 4096
13
14!xterm*background: black
15!xterm*foreground: green
16
17xterm*printAttributes: 0
18xterm*printerCommand: cat > ~/xtermdump
19
20!xterm*VT100.translations: #override <Btn1UP>: select-end(PRIMARY, CLIPBOARD, CUT_BUFFER0)
21xterm*VT100.translations: #override \
22        Ctrl <KeyPress> V: insert-selection(CLIPBOARD,PRIMARY,CUT_BUFFER0) \n\
23        <BtnUp>: select-end(CLIPBOARD,PRIMARY,CUT_BUFFER0) \n\
24        Ctrl <KeyPress> P: print() \n
25
26xterm*faceName: Ubuntu Bold:antialias=True:pixelsize=12
27xterm*faceNameDoublesize:Noto Sans Mono CJK SC:antialias=True:pixelsize=12
1apt install sudo
2cd /etc/sudoers.d
3vim user
4# Akvicor ALL=(ALL)NOPASSWD:ALL
https://wiki.ubuntu.org.cn/Ufw%E4%BD%BF%E7%94%A8%E6%8C%87%E5%8D%97
安装
默认UFW的规则是放通全部端口
1apt-get install ufw
设置默认规则
首先设置拒绝所有传入并允许所有传出。
请勿运行以下命令后直接应用,否则会直接锁定你的服务器。确保在应用默认规则前放通了SSH和其他关键服务的端口。
Environment
Add MinGW environment to Path: C:\MinGW\bin
Open Notepad++
Plug->Plugin Manager->Show Plugin Manager
at Available, double click ‘downloading list’
Search ‘Nppexec’, install and restart
Open Console
Plug->NppExec->Show Console
Compile
Plug->NppExec->Execute
Compile
- input:
g++ $(FULL_CURRENT_PATH) -g -o $(CURRENT_DIRECTORY)\$(NAME_PART).exe - click save, input:
Compile
Run
- input:
$(CURRENT_DIRECTORY)\$(NAME_PART).exe - click save, input:
Run
GDB
- input:
gdb $(CURRENT_DIRECTORY)\$(NAME_PART).exe - click save, input:
GDB
Add to Macros submenu
Plug->NppExec->Advanced Options
at Associated script:
- Add-> Compile and Run and GBD
- Menu items -> Place to the Macros submenu